Tuesday, August 23, 2011

Ready To Roll

This evening I put the finishing touches on the Motobécane Mirage restoration. I began by cutting the housings for the brake and derailleur cables. I saved and labeled the old sections of housing so that I could easily cut each new piece to size and install them in the correct spots. Routing the brake cables was a bit tricky because I replaced the old brake levers that had the cables coming out of the top of the hoods with modern levers that route the cables under the handlebar tape. I hated having all those cables in my face.


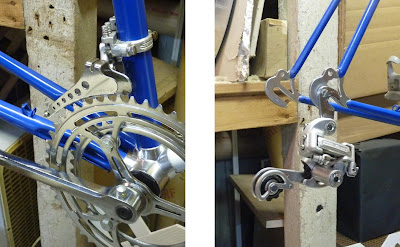
The front derailleur is a bit bizarre in that you pull back the lefthand lever to switch down to the smaller chainring, as opposed to the traditional pull and shift to the big ring. It appears to operate as a top pull derailleur like you can find on some mountain bikes, except the cable routing is from the bottom, so there really is no alternative but to operate in the reverse. Sacré bleu!

I had actually adjusted both derailleurs yesterday morning so that all I had to do was route cables and tighten them down. The cables will stretch after a few long rides, so I know I'm in for some future tweaking.


Next came setting up the brakes, which often makes you wish you had a third hand, particularly when you're dealing with the center-pull variety of brakes that are on the Mirage. Carrick actually came up with the idea to use a small clamp to hold the calipers together as you pull the cable and tighten it. I found if you clamp down onto the rims and tighten the cable, when you squeeze the brakes very tightly, the new cable usually stretches to just about the right position.

The last two steps were wrapping the handlebars and installing the cycle computer components. A mechanic friend gave me the advice to always wrap the bars from the bottom of the bars and go over the top towards you as you work up to the stem. Wrapping this direction will actually have your grip tightening the tape while you ride, an obvious advantage to keeping your bar work in place.


I purchased a couple extra sensors and transmitters so that I could install them on each of my different bikes and just swap out the display/monitor (whatever you want to call it) when I change machines. I have the numbers for the different wheel circumferences handy in order to get the correct milage for the respective bicycles.


Tomorrow I plan on taking my first real spin on the Mirage, after some seat height adjustments, etc. This brings my repaint project to a close, but I hope to check in occasionally with updates on cycling trips and, of course, tales from the repair shop. 

Sunday, August 21, 2011

Looks Like...A Bike!

Things are coming together nicely in between breaks to watch the Vuelta a España (Tour of Spain) and putting some stuff together for the new school year. The cables and housing for the brakes and derailleurs, along with some tape for the handlebars is all that remains to make the Mirage roadworthy. Reassembly is going smoothly, partly because I know what I'm doing, but also thanks to some helpful notes I took while taking the bike apart.

After installing the saddle bracket the other night, I took a measurement from my Trek road bike of the distance from the center of the bottom bracket (where the pedal axle goes through the frame) to the top of the saddle. This would give me a great starting point to find the correct riding position on the Mirage, but it will probably need some adjustment when I am actually able to sit down and pedal.

Yesterday morning I started with the headset by lubricating the bearing rings and inserting the fork steering tube. I found out the screws for the badge poked out a bit too far, so I clipped the points off to give the steering tube room to pivot. After making sure there was no play in the fork, I cinched down the lock rings with the bracket for the center pull brakes between them.


I then fit the mount for the headset derailleur levers onto the stem and inserted the bar assembly into the steering tube. I may have to fine tune the height and centering of the bars, but I started off with the top of the bars level with the seat. I climbed back on the chair to look down to see if everything was centered.

I greased the bearing rings for the bottom bracket and pushed them through the bottom bracket along with the pedal axle. I carefully threaded the adjustable bearing cup and tightened it to remove any play in the axle horizontally and vertically before securing the lockring. The pedals and crankset installation were simple but "old school unusual", with cotter pins that you insert through the side of the crankarm into a flat slot on each side of the pedal axle. The pins wedge into place and have a nut to secure them tightly.


I was a bit uptight about attaching the front derailleur because it involved clamping onto my newly-painted frame, but I was careful to spot it in the correct location. I made sure it was just a couple millimeters above the large chainring and parallel to it, so that I wouldn't have to damage the paint by having to move the clamp after it was tightened the first time. The rear derailleur was only a matter of securing a bolt in the rear drops. I finished up the drive train by reinstalling the chain.


After attaching the front and rear brake assemblies, along with some new brake pads, I completed the day's work by putting on the wheels. At last the bicycle is looking close to hitting the trails!


Friday, August 19, 2011

Great To Be Indoors

   I'm so glad that I was able to finish up all of the chrome work yesterday, because I might have to build the bike on an ark. I think the last time I saw such rain was back in college when a tropical storm came through campus. Son Carrick ran from the porch to the front sidewalk and back, about 15 feet, and looked like he had jumped in the neighbor's pool!

   Before I started the last few paint steps, I decided to sand the lugs as smooth as possible. I then put on a coat of Dupli-Color primer because I wanted all common paint products - hopefully eliminating all possible variables with conflicting ingredients in different paint brands. I sanded the first coat, cleaned the dust from the frame, then sprayed another coat of primer.   
   The next step was a couple coats of glossy black, which was recommended by an autobody specialist online. The Dupli-Color chrome paint was next, and I couldn't have been happier with the look!

   Taking off the masking turned out to be quite messy, because the silver paint just flaked off the tape in tiny particles that went everywhere. I looked like I was going to audition as a Vegas showgirl when I was finished! The only real problem occurred when the tape pulled up the clear coat from the red headtube. Only the red - I don't know why. I decided that instead of redoing all of the masking on that part and repainting, that I would just carefully peel off the remaining clearcoat and leave it as is. The red is glossy, and I just applied the clear for extra protection. That small surface should be no problem anyway.

   I now have the frame on the wall clamp, ready for reassembly. I wanted to reattach the headtube badge first, and I remembered that I had drilled out the rivets in order to remove it. I now had to search for some small screws to put it back on - going through Sears Hardware's selection of boxes was a real puzzle. I finally found some that were the right diameter and short enough so that they wouldn't extend too far into the headtube and interfere with the fork steering tube when it is inserted.

   I also found out that I would have to pay for being a nice guy. During a recent repair project I offered the old saddle from the Mirage to a client, whose seat was torn badly, since I bought a nice new Selle Italia to go on mine. Well I also absent-mindedly "donated" the clamp that attaches the saddle to the seatpost, leaving myself without one. I guess five bucks to buy a new clamp wasn't so bad for some positive P.R.

   I can't say the repaint project has been a lot of fun, but I'm pretty happy with the results. I know that I'm going to enjoy putting the Motobécane back together, and I'll keep you updated with my progress along the way.


Monday, August 15, 2011

Foiled Again By The Weather

This weekend I primed all of the lugs and sanded them smooth, cleaned them, then applied another coat of primer to even out the surface. The unbelievable amount of moisture that has been dropped on the Northeast in the last few days has delayed the application of the glossy black and chrome coats. I really want to do this step right, so I will be patient and wait for a clear, dry day without wind!

I received the Tour de France review issue of Cycle Sport magazine, and I found the commentary by their panel of writers very interesting. Yes, it was a more competitive tour than we've seen for a couple decades, but they argued that it may have been so because of the apparent cleaner (as in free of performance-enhancing drugs) racing environment. Riders who normally may have not been able to hang with the "superhuman" cheaters, now had an opportunity to keep up with the lead pack. Because the top contenders were so close in ability, teams were forced to try other tactics to get away, be it a one-two punch attack tried by the Schlecks or a very early surprise break tried by Alberto Contador during the final Alpine stage.

Curiously, Contador was not as dominant in this year's Tour as he was the past two. I know Contador may have been fatigued from winning the Giro d'Italia, but I think he is also distracted by the allegations of drug use. Fans and the media question his every success and see justice in his failures. I think his talk of "tainted meat" is a joke, and the way the investigation has dragged on is ridiculous. Several lesser profile cyclists were immediately suspended with less evidence against them!

I'm not a big fan of Contador, finding him a bit of a punk with his finish line/podium pistol-shot salute - NFL end zone celebrations don't belong in cycling! I didn't like that he attacked the yellow jersey wearing Andy Schleck in last year's Tour when he had a chain problem. He saw it happen and chose to break the cyclists code of sportsmanship. I absolutely HATE it that he tells the press when he concedes a victory to a breakaway companion. Why cheapen the success of a fellow cyclist with such arrogant talk? Again, trash-talk is NFL, not UCI.

Now I have to admit that one of my favorite cyclists, Alejandro Valverde, is currently serving a suspension for alleged drug use. His case dragged on, mostly because the main evidence against him was association with the wrong doctors. Like thousands of other fans, I was stunned and disappointed when I found out the truth about one of my cycling heroes. I hope he gets things turned around and comes back performing well, and clean.


I was reading a bit about cyclist David Millar and how he has turned his career around after a drug suspension. He recently wrote a dark book in which he was very revealing about everything that happened to him, and avoided making excuses. I found it amazing that one piece of evidence police found when trashing his room was a used syringe that he saved as a souvenir to remind him that he cheated to win a stage in the Tour de France! A few years ago Garmin-Cervelo gave him an opportunity to join the squad under close scrutiny. Millar's (natural) abilities helped lead them to an overall team title in this year's Tour, four stages total, including a stage two team time trial, Millar's specialty.

Cheaters do occasionally win, but we should expect them to be exposed. If they get a chance to admit their mistakes, hopefully they'll do so and encourage others to go a different route.

Friday, August 12, 2011

Bicycle Fit - Part 2


I spent several hours today masking the painted and decaled parts of my frame in preparation for the "chroming" of the lugs. I used my fingernail to press the blue painter's tape into the seams around all of the lugs, then used a new Exacto blade to cut away the overlap. The head tube curves were tricky (left photo), but the most difficult lug to mask was at the seat tube and seat stays (right). The logos on the tape are kind of distracting, causing me a few times to do a double-take when looking for errors! Painting the lugs will probably start tomorrow.


Continuing the discussion on bicycle fit, here is a chart to help you solve common snags in your quest for a proper bicycle fit:


Bike-fit Troubleshooting
Symptom
Likely Cause
Solution
You are shifting forward on the seat frequently
Stem may be too long, causing you to pull yourself forward as you ride; downward tilt of saddle nose may be excessive; saddle could be too far back  on its rails
Install a shorter stem; level the saddle and center it on the rails; move seat forward
You are shifting back on the seat frequently
Short stem may be making you feel crowded, causing you to move back; upward tilt of saddle nose may be excessive; saddle could be too far forward on its rails
Install a longer stem; level the saddle and center it on the rails; move seat back
Lower back pain
Stem may be too low or long, causing strain in back to reach bars; seat may be high, causing hips to rock when pedaling
Raise the stem/handlebars or if pain persists, install shorter stem; adjust seat height 
Neck pain
May be craning neck to see because of low stem and handlebars
Raise the stem/bars
Hand pain
Stem too low, causing you to put weight on hands; saddle may be pointed down
Raise the stem/bars; level saddle
Pain in front of knee
Saddle position is low and/or too far forward, straining knees
Raise seat; moving the saddle back may be needed as well
Pain behind knee
Saddle position is high, causing over-extension of legs
Lower the saddle
Rear end numbness
Too much weight on the seat; try to slide back a little on the seat so that you feel the weight on your sit bones, not the front or center of the crotch
Lower handlebar position; check saddle height; maybe try another brand of shorts and /or seat; lose some weight (sorry)
Achilles tendon pain
Pedaling too much on your toes; feet may not be centered over the pedal because cleat is too far forward on shoe
Position cleat on shoe so that ball of the foot is over the pedal axle

Some additional tips you might find helpful:

1. So much about your riding style is affected by comfort. The most common problem is a hunched-over riding posture, when a cyclist locks the elbows and raises the shoulders. Try to relax, and every few miles shrug your shoulders and let them drop. Remember to keep those elbows bent.
2. NEVER raise any part of the bicycle too high because it can lead to failure, which you definitely do not want to happen while moving! Parts are usually marked with limit lines - heed these markings.
3. Once you’ve found the correct seat and stem height, mark them. If something slips out of place or if the bike needs to be disassembled, you’ll quickly be able to put your parts back in the right spot.
4. Place one of your pedals in the down position, parallel to the the seat tube. Measure from the top of the saddle to the center of the pedal axle and record the number. This will be very useful if you have to set up a new bike, rent or borrow one.
5. You are not as flexible early in the cycling season, and you may enjoy a higher handlebar position. As you regain flexibility, you can lower the bars to stretch out.
6. Because they generally have smaller proportions, women often require replacement parts such as narrower handlebars, shorter stems and brake levers with a shorter reach.

Tuesday, August 9, 2011

Bicycle Fit - Part 1

The Motobécane repaint project is nearing completion, if only the weather would cooperate. One day it's too hot, one day it's too humid, and today it just rained constantly! Yesterday I was able to finish the fork and stripped off the masking, but I ran into a minor problem with the frame. I rushed things a bit, and ended up with a run in the clear coat. Nothing major - when it dried, I lightly sanded it smooth. Now I just have to go over that spot again very patiently, which is hard to do when the last few steps are so close.


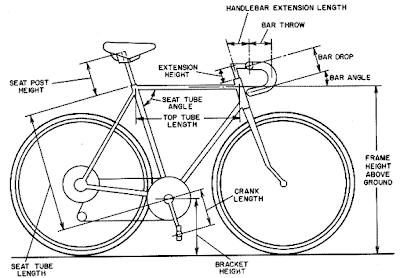
No, I'm not going to intimidate you with all this bicycle geometry stuff - just trying to shake you up a bit! However, I thought great diversion from the project would be a discussion about bike fit, that is, the way for you to find the position which will provide the safest and most efficient pedaling motion. I will first address each adjustment and then explain the method to find your correct position for each.

Seat Angle
Adjustment
: You should initially start with the seat parallel with the ground. If you experience discomfort, tilt the seat angle up or down a maximum of about 3 degrees.
Method: On most bikes a bolt is located near the top of the seat post that loosens, allowing you to adjust the seat.
Seat Height
Adjustment
: Put on your cycling clothing and place the bike on an indoor trainer or position yourself on your bike in a doorway to hold yourself up while pedaling. Have someone sit behind you to observe. Raise the seat until, as you pedal backwards with your heels on the pedals, your legs are completely extended at the bottom of the pedal stroke. If your hips rock side to side in order to reach the pedals, the seat is too high.
Method: The bolt that holds the seat post in place is on the side of the frame by the base of the post. Pedal backward until one pedal is at the bottom of the pedal stroke. Your heel should just be able to touch the lower pedal with your leg straight so that when you place the ball of the foot on the pedal, your knee will bend.

Pedal/Shoe Adjustments
Adjustment
: A cleat or toe clip is important to ensure that your foot stays in its most efficient pedaling position, with the ball of you foot over the axle of the pedal.
Method: Traditional toe clips, which include cages and straps, can be attached to pedals to hold feet in the correct position. Although clipless pedal systems may take some practice, you will find them much easier to get in and out of than toe clips. The position of the cleat on the sole of the shoe can be adjusted to make sure that when you click into the pedal, the ball of your foot is centered over the pedal.
Seat Fore/Aft Position
Adjustment: While on the bike and with one pedal located at three o’clock position, have an assistant level the crank arm and the pedal. Maintain that position while your helper holds a plumb line against the indentation just beneath the bone that’s below your kneecap. Adjust the seat forward or back on the rails until the plumb line bisects the pedal axle, making sure your knee is not in front of the center of the pedal.
Method: Loosen the same bolt used to adjust the seat angle.
Reach to the Handlebars
Adjustment
: You are really looking for the most comfortable spot in which to reach the various handlebar positions on your bike without locking your elbows, straining your neck, hurting your back or having to shift forward or back on the seat. Pay attention to your position when riding, or video yourself to see how you look. While seated, look down and note where the handlebar is in relation to the front hub (wheel axle). On road bikes with drop bars, the reach is usually correct when the bar hides the hub. On mountain bikes the correct spot usually places the bars about an inch ahead of the hub.
Method: Unfortunately changing the reach requires installing a longer or shorter stem, which holds the handlebars in place, allowing you to steer.
Handlebar Height
Adjustment
: Again, comfort is the goal.  Lower back, neck, arm and/or hand pain would be evidence of leaning too far forward. Conversely, if all your weight is on the seat and you feel every bump and shock in your rear end, you’re sitting too upright. Hold a yardstick on the seat so that the yardstick extends over the bars. On road bikes the handlebar height varies from level to about four inches lower, an extreme racing position. Mountain bikes have handlebar height ranging from an inch or so above the seat to three inches below.
Method: Your bars may be raised or lower by adding or removing spacers, if there are bolts on the side or back of your stem. You may have to purchase a taller stem, or on a mountain bike, taller bars may do the trick. If your stem has a bolt on top, loosen the stem by turning this bolt counterclockwise and then striking the bolt with a block of wood to knock free the wedge that holds it in place. Raise or lower the stem to the desired location and refasten it, but be sure not to exceed the safety height marked on the stem.

Part two of “The Bike Fit Story” will include troubleshooting and some other tips.

Sunday, August 7, 2011

Hobby Crossover

My experience as a model railroader dealing with waterslide decals was valuable today when applying the Velocals to my Mirage. I was warned on the instructions that the adhesive was very aggressive, and if you tried to apply them as packaged, you would have one shot at aligning them, and that’s it. Considering that the decals on the top tube consisted of a long, thin arrow stripe, the idea of a single attempt at getting the graphic straight didn’t sound so good.
A suggested method of application consisted of taking off the backing paper and spraying the adhesive surface with a mixture of water and Dawn dishwashing liquid. I thought of buying a generic liquid, but I feared that the manufacturer found that something about that particular brand helped delay the setup of the adhesive long enough to allow repositioning of the decals. I decided to “splurge” on the few pennies more, and follow the directions precisely.
The instructions listed a few techniques for centering and alignment, but I’ve always had a knack for eye-balling things level. I don’t know if it’s my artistic ability or my experience with architectural drawing, but I’ve often had the best results just adjusting until it “looks straight”. I certainly wasn’t going to draw any kind of guidelines on my frame!


My tool set: a spray bottle full of the soap and water mixture, scissors, an old gift card, a plate on which to spray the decals and a towel over which to spray the fork and frame


The transparent carrier film on the face of the decal allowed me to move the logos around and get an idea where I wanted them. Once I was satisfied with location, I used an old plastic gift card to squeegee out the water and air bubbles, and dabbed the surface dry with a paper towel. Unfortunately the curve of the tubing kept causing the somewhat rigid carrier film to curl the decals away from the paint.  The decals would need an hour to dry before I could peel the film away, and I didn’t want to sit there holding each decal around its respective tube that long!
I thought of securing the decals around the tube with blue painter’s tape, but I didn’t want it to stick to the carrier film and run the risk of pulling something out of position. Looking ahead, I also needed a method that wouldn’t leave adhesive residue on any of the decals that would eventually be on the opposite side of the one I was working on. I finally came up with the idea of applying the tape in reverse (adhesive side up), looping completely around the tube and decal. I needed an occasional third hand from son Colin to break off pieces while I held something particularly stubborn in place, but the technique worked perfectly.
After an hour, I removed the carrier film and found there were still some wet spots, but the decals were stuck in place well enough that I could just dab the water away. The gold decals are subtle on the red fork, but look fantastic on the white top and down tubes. It was difficult to a get a really good photo of everything with the flash reflecting off of the gold.


Note that the lugs and rear drops are still masked - when the weather improves I'll be able to complete the clear coat spray, and I’ll be onto the lug “chroming” process.

Monday, August 1, 2011

Love the flat of the shore, but not the flats

My family and I had a great time down at the Jersey Shore the past few days, highlighted by a Saturday night seafood fest to celebrate my father-in-law's birthday. Clams, lobster, mussels, crab, shrimp, beautiful weather and good company made for a wonderful event! I somehow managed not to stuff myself until I popped, but I was especially glad that I never developed a drinking habit and didn't need to work off the extra beer calories as well. I know the birthday cake wasn't necessary at the end of the meal, but I thoroughly uphold the idea that a good dose of ice cream coats, soothes and relieves!

Riding my bicycle is an absolute MUST at the shore, and of course is the best way to balance out the poor eating habits that always creep in when hanging around the beach house! Sue and I always enjoy tearing around the pancake-flat barrier islands, if we can manage to arrange the ride with a tailwind on the return. Days like Sunday, with winds from the southwest are perfect - I rode out along the causeway, onto the mainland towards Cape May in the shelter of the trees. The wind was then at my back as I looped back on the Delaware Bay side of the peninsula, and I was flying until...plink, a stray piece of pea gravel between the tire and rim. Psssssst - flat tire!

Now, I can't even begin to count the number of flats I've changed over the years, even before I started repairing bikes for other folks, so it isn't anything difficult. However it is a big-time pain in the butt when you are out riding, even if you are like me and have learned to take everything you need with you in case of such "emergencies". When the repair is finished, the legs just aren't moving like before and your morale has taken a huge hit.

I won't waste your time with tire changing tips, because you can find plenty of YouTube videos to help you become an expert, but I will give you some special advice. It is helpful to put a little bit of air into the tube before installation. This will help shape the tube around the rim and avoid pinches or twists when you are inflating the tire - MAJORLY important! I tell anyone who will listen to always take an extra tube, a small repair kit (in case of more than one flat - argh!), tire levers, and a small pump or CO2 cartridge. These supplies will easily fit in your jersey pockets or the pack under your saddle.

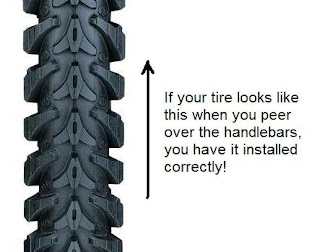
I don't think about it much, mainly because road bike tires seldom have a significant "tread" and I've never had a flat mountain bike tire (I've now jinxed myself), but maybe you've wondered about the direction the tire should be installed to take advantage of the tread pattern. Some tires will have a marking on the sidewall to indicate which direction they should spin when moving forward. If such information is missing, install the tire so that when you look at it from above, the arrow pattern formed by the tread points to the front. The back tire tread, however, should point towards the back for proper traction.


Lacking any obvious pattern, another handy guide would be if there are coloured manufacturer’s logos on one side of the tyre and not the other. Bikes are pretty much always photographed from the side of the drivetrain (chain, cogs, chainrings), so manufacturers place their main logos on this side. Install your tires in this manner, and you can't go wrong!

Here's a manufacturer's photo of the drivetrain side of my ride - hey, I can just make out the blue logos at the top and the word BONTRAGER on the bottom of the tires. Now I'm scrambling to the garage to double-check that I followed my own advice. Carrick is muttering, "Old-timer's disease!"