Tuesday, February 24, 2015

Fallen Hero

   In the mid-1980s, when I was first getting into cycling, I would occasionally pick up an issue of Winning Bicycle Racing Illustrated at the local shop. Unlike Bicycling magazine, which focused on training techniques, new equipment and beautiful locations in which to ride, Winning was all about pro racing.
   The wonderful photography was the big draw, with the legendary Graham Watson providing some of the most memorable images. His name might not sound familiar to the casual cycling fan, but if you have ever seen a photo from the Tour de France, the odds are pretty good that it was taken by Watson!
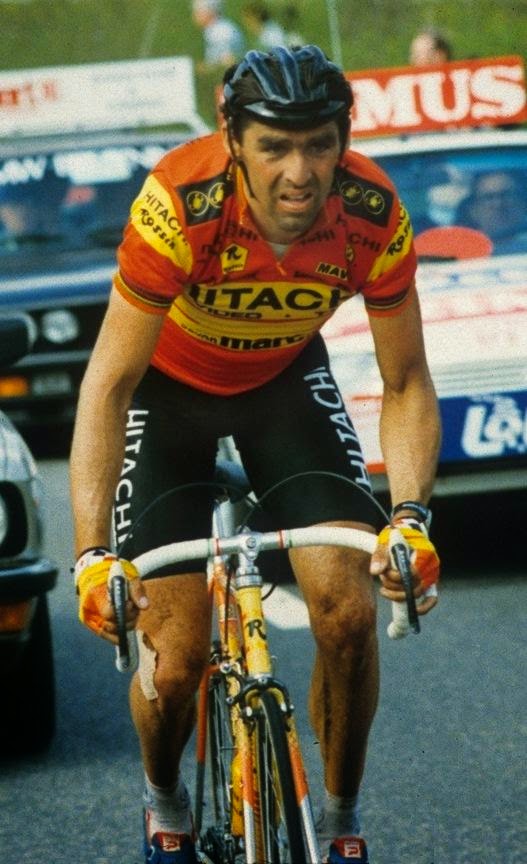
   When I decided to buy a subscription to Winning, one of the first issues that arrived in my mailbox featured a photo of Belgian great Claude Criquielion (kree-kay-lee-ON) on the cover. Maybe because I am a Flyers fan, I was drawn immediately to the orange and black of his Hitachi team jersey, which also had cool scorpion logos of the garment manufacturer Castelli adorning the shoulders.
   I quickly became an admirer of Criquielion, a fantastic all-around cyclist who finished five times in the top ten at the Tour de France and won a World Championship in 1984. He excelled in the northern classics in and around his native land, winning the Tour of Flanders in 1987, as well as La Flèche Wallonne in 1985 and 1989.

   A couple of years ago I had purchased a small Criquielion cycling figure that I envisioned taking on my next European trip for some humorous photos. My brother-in-law did something similar with a Knight Rider toy for his Half Hoff Facebook page.
   Unfortunately, while watching some early season cycling highlights on Friday morning, I was saddened to hear of Criquielion’s passing. A clip showed the peloton pausing in a moment of silence at the start of a stage of the Tour of Oman. The commentator explained that the 57-year-old had died that morning after suffering a stroke overnight.
   After reviewing some of Criquielion's palmarès, he mentioned that Claude was director sportif for two different professional teams, including the 2005 Landbouwkrediet-Colnago squad, of which his son Mathieu was a member. Since 2006, Criquielion had been serving as alderman for the municipality of Lessines.

   Despite his various career achievements, Claude was probably best known for the photo on the left and the incident surrounding the captured image, as he was attempting to win his second World title in 1988 on the roads of his home country. Belgian fans screamed as Criquielion and breakaway mate Maurizio Fondriest neared the finish line in the city of Ronse. The young Italian would go on to have a fantastic career himself and win many big races, but at this point he was only in his second year as a pro and  looked to be a bit in-over-his-head on such a big stage.
   Perhaps in an attempt to conserve energy for the sprint finish, the two dawdled enough to let Canada’s Steve Bauer bridge up to them alone. Because of Fondriest’s inexperience and the energy Bauer had spent to catch the breakaway by himself, Criquielion was a major favorite to win as the three came down the homestretch.
   At nearly full sprint and just meters from the line, the Canadian inexplicably reached towards his downtube shifters. As Criquielion attempted to pass, Bauer swerved to his right and threw out his elbow, sending the Belgian crashing into the barriers and leaving Fondriest to claim a shocking victory (see YouTube video). The Canadian was eventually disqualified, which was little consolation to Criquielion. He was left with nothing except a broken bicycle, as other cyclists had eventually ridden by him to contest the other two podium spots.

   This regrettable event was expectedly mentioned in biographical information posted about Criquelion after word of his death spread around the cycling world, but there were also plenty of wonderful comments and stories shared by his colleagues and rivals.  Repose en paix, Claude.


Tuesday, February 10, 2015

Molto Bella Bicicletta

   It has come a long way from the mess (see it here) that was delivered to my front door last February, but the completed Pinarello Treviso looks pretty fantastic, if I may be allowed to express my biased opinion. After the disassembly complications, hours of frame stripping/cleaning, inspection with Peter Dreesens, repaint work with Bruce Tatem at Virtuair Studios, application of decals, and ultimately reassembly, the project has finally come to a close!

   Most of the work was straightforward, since most of the parts were in top condition, but there were just a few minor tweaks to have everything operating properly. There was a washer missing from the front derailleur, but that was a simple fix with my spare parts collection. I had to find the proper position for the rear wheels and then set the dropout adjusting screws in the appropriate spots.
   The brake pads needed to be readjusted to align correctly with the rims, as the Pinarello fork had slightly different dimensions from the incorrect Tange version which was included with the bike when it was delivered. I always get uptight about setting up the front derailleur on pristine paint, since the bracket is bound to mark the seatpost when it is tightened, but it is just a matter of loosely closing the part until you find the correct height to clear the large chainring.
   I also found that the chain had not been sized correctly on the Treviso as it was delivered. Removing a couple links was necessary, especially to prevent the slack in the chain from slapping down on the chainstay’s fresh paint job when a rider hits a bump!
   With some of the freezing rain and icy conditions we’ve had lately, I had to wait a couple of days to snap some pictures. The last thing I wanted to do was slip on the driveway and scrape up the “new” bike!
   I took plenty of shots to prepare for listing the Pinarello, since there are so many details I wanted to highlight. If you are interested in a fantastic vintage machine, or know someone who is, please let me know.


   While I am awaiting delivery of the Bottecchia frame from overseas, I have collected most of the parts required for the build. I have the Dura Ace rear derailleur leftover from the Bianchi Cross Concept conversion, but I needed to find a matching front derailleur to match. I’m still on the lookout for a crankset at a decent price to complete the drivetrain.


   The frame purchase included the original ITM seatpost, and I found a Selle Italia Flite “Team Edition” saddle that nicely matches the bike’s paint scheme.   Building up from the existing Miche headset, I’ll use a quill adapter to accept the more modern ITM stem setup. I also purchased some ITM Super 330 anatomic handlebars to go with the stem. I have the Dura Ace brake/shift levers from the Bianchi and will try to find some white Cinelli bar tape to finish the bicycle “cockpit”.


   I hooked up with a seller on craigslist for an excellent set of racing-quality Mavic SUP wheels built with Dura Ace hubs. They came with a decent pair of Continental tires already installed, but I’ll hang onto those, because Michelin was the tire of choice for the ZG Mobili team. I also talked a seller down $10 from his asking price on a Dura Ace brakeset.


A little luck is key, but I’m pleased that quality components can still be found, while keeping within a reasonable budget!


Tuesday, February 3, 2015

Coming together...finally!

   At last, the Pinarello Treviso project that I started last March (see intro article here) is drawing to a close, now that the recommended time for the clearcoat curing has lapsed. Saturday afternoon I gathered the materials necessary to apply the vintage decals supplied by VeloCals.


   I had used a similar process during my Motobécane Mirage project back in 2011, except that these Pinarello decals had a special UV coating and would be applied on top of the finished paintjob, as opposed to having a clearcoat sprayed over them afterward. The key step is to spray the back side of the decals and area of application on the frame with water, mixed with a couple drops of Dawn dishwashing liquid. Some special ingredient in Dawn “relaxes” the otherwise aggressive adhesive and allows it to be manipulated into position, otherwise there would be just one shot to get everything centered on the frame.
  The wet process also allows the elimination of air bubbles under the decals by “squeegeeing” the sheets onto the frame with an old credit card. Although the decal mask wraps fairly easily around the frame tubes when you are holding it in place, I learned last time around that as soon as you let go of it, the mask will straighten out and lift the decals back off of the frame. To hold the sheets in place, I developed the technique of wrapping everything in strips of masking tape adhesive-side-out so that I could slide the rings into position where I needed them, keep tape residue off of the frame and also avoid damaging decals on the frame when I was applying the ones to the opposite side.
   I mentioned when I was working on the Mirage that I am remarkably good at eyeballing things straight and on-center, but beforehand I had drawn a light pencil line through the middle of each decal mask to aid my perspective, since the letters have different shapes that can throw the eye. I also discovered that light playing off the “candy” paint job visually distorts the tube shape! I also made sure to rip off plenty of tape strips beforehand, so that I didn’t need to make any calls for aid during the process - another lesson learned from my previous decal experience.


   I started with the single Pinarello lettering decal on the seat tube and then took care of one side of the down tube. After about an hour I was able to slowly peel away the mask and then use a lint-free cloth to press out any water that might still be present. I let the first round of decals set up overnight, and on Sunday afternoon I attached the lettering to the other side of the down tube.
   Monday morning I was finally able to dip into my collection of parts that have been sitting around waiting for months to be turned back into a bicycle. I used some tiny screws to put the head tube badge in place and then took on the small, but very satisfying, step of assembling the Campagnolo headset.


   Because they were small, I simply attached the Columbus logos on the fork and seat tube by "dry method". I will probably have the bike completely assembled by the end of the week, but there certainly isn’t any rush at this point. Not many folks are out riding in the snow and ice, and a select few are looking for vintage bicycles in February!


In the meantime, I have collected the majority of parts for the Bottecchia project - just waiting for the frame delivery from Germany. More details on both bicycles next week...