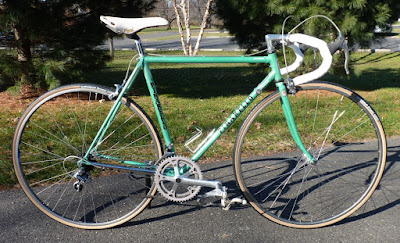
I was able to finish off the Pinarello Dolomite bicycle and now have it listed in the For Sale page. It wasn’t too complicated of a project, just time-consuming, as it involved a good cleaning of everything and then picking out the remains of the brittle decals that are so common on Pinarello bikes of this era.
As in the past, I was left with letter “shadows” in the clear coat, so I had to make sure the kerning (space between the letters) was correct before applying the VeloCals. I’ve shared measurements with them in the past for certain models, but the Dolomite was a new one for me, so I was expecting issues. Well, the downtube decal was spot on, so it was a simple matter of lining up the first and last letters, and the rest fell into place.
The chainstay decal is small and in one piece (not individual letters), so the inaccuracy of the letter size and spacing aren’t noticeable, but the vertical lettering on the seatpost was WAY off. I was left with the tedious process of applying the letters individually in the clearcoat spaces.
All that was left was some new bar tape, and I added some finishing tape with Italian tricolore striping. I think the hard work paid off:


The glitches I mentioned earlier were a stuck drive-side bottom bracket cup in the Colnago Super, and some wonky threading in the drive-side of the bottom bracket on the Coppi frame. The Super was a fairly simple fix, at least that’s what the guys at Bikesport told me after I picked it up from their shop. Usually it just involves more (and younger) man power for the operation. Unfortunately, the Coppi’s bottom bracket had to be re-tapped, and they didn’t have the Italian version of the tool. Well, I knew someone who did have the proper tool, and I promptly sent him a message.
I received a return call from Peter Dreesens yesterday morning, and he updated me on progress with the stuck seatpost in the Tommasini. After maintaining a constant soaking of PB Blaster (which is a penetrating catalyst/lubricant, if you aren’t familiar) for a few days, Peter had welded a 3-foot section of tubing onto the remaining seatpost metal in order to gain some twisting leverage. Unfortunately, the post didn't budge, and the metal began to twist apart where we had drilled through in order to attach the bolt for the slide hammering.
We agreed that the best bet would be cutting the metal flush to the top of the seat tube, as well as restoring the expander slot down the back, with the intent of inserting a narrower seat post. Peter had the job done by the afternoon, and I took the Coppi frame with me to swap projects. Peter had done an excellent job with the cuts, and while I was there, he even slid in a spare piece of 7/8 in. (22.2 mm) tubing he had in stock to confirm the correct post size we would need.
He then took the Coppi frame and set to work, telling me it would take very little time – well, maybe for someone with his experience! It was an interesting operation to observe, and the tool kinda looks like a cartridge bottom bracket that someone turning into a torture device! Peter’s looked a bit different than the Park Tool photo below, but it gives you a good idea of what I was seeing. One side keeps the tool centered and aligned properly in the shell as the thread cutter is cranked inward. The blade has a clever star shape so that removed material has a place to be expelled and not bind the tool as it cuts.

Peter also suggested that he should face the bottom bracket, which involves cleaning the outside edge of the shell down to the bare metal, so that the BB cups sit squarely on the frame when installed. This operation was completed using a similar tool to the tap, but this had a larger cutting blade (see below) to remove the paint and any imperfections in the metal casting. I held my breath a bit, hoping the new paint wouldn’t chip, but Peter did a wonderful job with no problems at all!

When I returned home, I snapped some photos of the “seat post solution” to share with its owner. The paint in the clamp area appears pretty gnarly from all the attempts made to free the post, but I reassured Brendan that sprucing it up would be relatively simple, since it is one of the few spots on the frame that has a solid color, not some airbrushed fade effect - it should look fine with some cherry red touch-up enamel.
The only problem now is finding a post – I had seen a vintage ITM post on eBay, but it wasn’t quite the correct diameter (22mm), and Peter suggested that the size is critical, considering the added material that the seatpost binder bolt is now going to need to squeeze in order to keep a seatpost from sliding. I did see a rather flashy anodized red ITM post elsewhere, and I haven’t received Brendan’s opinion on that, but I did suggest to him that if any bike’s colors would match up with the seat post, it would be the wild paint job on the Tommasini.
Hey Glen, I'm well aware that it's now some 7 or so years you wrote this blog post & thus I'll keep this as succinct as possible but as a lifelong LeMond, LOOK & La Vie Claire NUT (7 of my 13 bikes are LeMond TDF replicas from his '86, '89 & '90 victories & 8 of my bikes are LOOKs - 2 of those are part of my LeMond TDF collection), I know my LOOK, Mavic, Shimano & Campagnolo (yes, rather strangely - primarily as a form of teenage rebellion against my Campy-loving father - I've always respected, but never loved, Campy - I even love referring to them as "Campy" because so many "Campy" nuts HATE that term, haha!!), I know all of the stuff, from the late '80s & early '90s, in particular, rather well...the La Vie Claire team never used the Delta brake calipers of which you speak, although they were released to the pro's in '84 & to the public in '86, before finally being cancelled altogether in '92, because although they're easily the most aesthetically beautiful brake calipers ever produced, they were FAR too complex/convoluted & after 5 different iterations of them, they just couldn't get them right - I'd like to say sadly but as a Shimano freak, I just can't! So, as LeMond was out of the '87 & '88 TDF's after his brother-in-law shot & almost killed him while they went out hunting in April of '87, LeMond won the '89 TDF with ADR-Agrigel & MAVIC components & then the '90 TDF with the Z Vêtements team, this time with the famed/infamous Delta version of brake calipers, which look especially beautiful upon the neon tricolour LEMOND frames that the 'Z' team rode during the '90 TDF. So there you go, mate! So much for succinct, I know but I can, at times, ramble EVEN MORE than this!!
ReplyDeleteCheers & best wishes from the ridiculously hot Mornington Peninsula & I sincerely hope that 2025 has begun well for you...Matt.
PS. I happen to own a LOOK 695 SR in the Mondrian 'Heritage' colours, btw...NOT the Aerolight that came out a little later & nor does mine feature the funky concealed brake calipers that I also quite like...somewhat strangely, due to surgery upon my lower back a few years ago & then a few other mishaps, I'm still yet to have ridden the bloody thing & as the original owner from whom I purchased it only ever rode it some 300 km's, it's not been done justice, I'm well aware of this...but man, at least that means that the ridiculously expensive LOOK Zed 2 chainrings (53/39 130 BCD) are still in near-new condition, plus I also have 2 brand new spare chainring sets for it as well (1 x 130 BCD & 1 x 110 BCD, as it can take both)...I really should just sell the beautiful thing to an owner that will both cherish & ride it but it's just too bloody beautiful to part with the damn thing!!
PPS. If you happen to google "2012 LOOK 695 SR Mondrian Heritage", then the very first result in 'Images' should take you to a photo (& article by Bike Radar) of the exact bike, btw...
Wow - your message is almost as long as my blog! I appreciate your note, as it included some interesting info, but you could have just sent me an email. Yes, you should stop saying "Campy"...ugh, and I wondered why, with so much of the subject matter to which you referred present on in many of my other blog entries, why did you post to THIS particular, very old, entry?
Delete...oh, and as much as I love the 695's Mondrian paint, I really dislike that stem. I also prefer that swooping continuous line, from seat stay through the stem, on the 2015 795 Aerolight.
Delete