For a while I have been wanting to reorganize my shop, not only because it always seems to become cluttered with extra parts at the end of the cycling season but also to be able to access my tools more effectively. I also wanted to display my bicycle collection more effectively and move it closer to the work space.
Whenever I have customers visiting my shop, I end up repeating the stories about the bicycles I own. Years ago I had built a bike for a friend, and he had told me about the area in his home where he stored the bike, which included memorabilia and photos that explained its back story. For a while I have had the idea of a small photo and some text hanging near each of my bikes, so that visitors could get the background all on their own.
The first step in my little renovation project would be to sort through all the parts and clear them out to be sold off on eBay. It was great to see some empty table space, even if I knew it was going to be covered up with bits from projects I would be working on in upcoming days.
I usually keep a couple bikes in our sunroom, as that is a location for easy access to the side door for rides. The rest of my bikes had been hanging in the rafters, upside down from their wheels, on the far side of my basement. I had the idea that if I could find a few feet of blank wall space, I would instead be able to hang them parallel vertically, with the wheels leaning onto the stone wall.
There happened to be about a five-foot-wide cutout in the wall just to the left of the workbench I had received from my father-in-law a couple of years ago. This seemed just like the spot I needed, but it was occupied by a low storage cabinet. I rotated one of the nearby storage shelves to form an L-shape with the other one behind my shop storage unit/table, and then slid the low cabinet back into the spot where the rotated shelf had been.
I slid my shop storage unit/table back a few feet to make the bicycles and low cabinet more accessible. Across the rafters in the cutout space I installed a 2x4 beam so that I could screw the hooks onto which I’d hang the bikes.
You can see that by alternating the hanging of the bikes by front wheel and back I was able to compactly store the bicycles in that space. I completed this part of the project by creating little plaques to hang from each bicycle – you can see the text and photos I used on
THIS page.
I acquired from my mother’s collection of furniture a neat little stack of shelves that resemble vintage luggage (on the right in photo below). I filled the unit with a bunch of my tools and small parts, so I no longer have to dig through the few boxes in which I used to store them. Just above that shelf unit, along the wall, you can see the hole/slot into which I slide my wall clamp to work on bikes. The floor mat is another indication of my spot for doing repairs, etc.

The next image is a close-up of how the pipe clamp slips into the work bench/partition wall my brother-in-law Jay and I built years ago, after a big basement water abatement project. Without a lot of free wall space, it was important to have something that could be easily removed when not in use. No one wants to conk his head on a heavy metal pipe when heading over to do the laundry or grab something out of the basement freezer!
If you turned to the left, this is the view you’d see, towards my father-in-law’s workbench and some of the signs and posters I have decorating my shop.

A while ago, my son Carrick’s friend Alex snapped the cool photo below of the vintage bicycles I had hanging in the rear of my shop, behind the freezer. Although the image includes a bit of lumber and unwanted clutter that will be gone when I finish up my model train layout, I still like the pic a lot. The fisheye perspective is interesting, and the variety of bikes I had hanging at the time was outstanding: Vitus, Peugeot, Coppi, Tommasini and Gios!
There is another major renovation - as you may have already noticed - to the Cycle Tech logo. 2021 marked the 10th anniversary of my business, and I wanted the design of the logo to more reflect my preference for building/working on vintage bicycles. Yes, the cycling world might be going to disk brakes, hydraulics and electronic shifting, but I don’t have to like it. I promise to keep my grumbling to a minimum!
By the way, Cycle Tech’s
previously-mentioned “Ride with Santa” was postponed, due to the awful weather this past Saturday evening. Instead, we will be heading out to Reading this coming Saturday, the 18th of December. Dress appropriately (warmly?), put some lights on your bike and come join us!
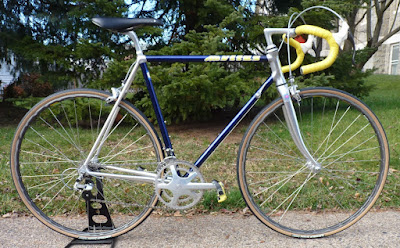
Finally, I snapped some photos of the long-awaited completion of the Vitus 992 build. There really weren’t any complications – it was just a matter of removing the last bits of crumbling old decals, putting on the replacements and then building up the bike. Included are Mavic parts that are rare, not only because they are hard to find, but also because they are in such fantastic condition. The Vitus is now listed on my
For Sale page.
I’ll catch up with you after the holidays – stay safe, and have a very
Merry Christmas and a Happy New Year!