Thursday, December 17, 2015

I met Miss Understanding

(The title is a song reference from all-time favorite musician, Jason Falkner.)

   When discussing bicycle sizes I have often explained to people that I feel comfortable on bikes anywhere in the 53-57 centimeter range. Because I am rather long in the torso, I can make a low saddle adjustment and use the longer frames to my reach advantage. With a higher saddle adjustment and a longer stem, the smaller frames can also feel very comfortable.

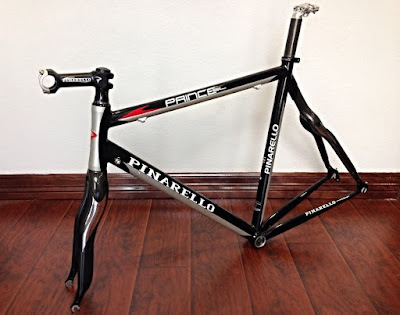
   I was under the impression that my Pinarello (photo left) had a 55 cm frame, as that was the measurement given by the person who sold it to me. I had no reason to think differently, as it appeared to be of similar size to others in my collection and is the most comfortable to ride of the bunch. However, when someone inquired about the dimensions of the white FP2 frame I was selling, I found myself consulting an online Pinarello geometry chart and discovered I had been deceived.
   The complication arises from the fact that many modern frames have a sloped top tube, which renders the traditional seat tube measurement useless. A more accurate method of measurement would be to provide what I like to call “A-line” length. Looking at the diagram below, the “A-line” would be an imaginary line drawn from the center of the top tube/head tube junction, parallel to the ground where it would intersect the center of an extended seat tube – a representation of the location of a traditional top tube.


   By looking at the Pinarello geometry chart and taking some measurements, I confirmed that my FP2 is, in fact, a 53 cm! I then began to consider my other bicycles, and if there were any changes I would want to make to more closely duplicate the comfort level of the Pinarello. The Colnago (56 cm) has always been a dream bike of mine and has wonderful proportions, so it is a definite “keeper”, although I am now considering a shorter stem to relax the reach a bit. My Bianchi ‘cross bike is also a 56 and has upright bars, so it has no comfort issues to speak of.
   I had been working on so many red bicycles lately, I had considered throwing a bit more color into my collection and ditching the Saeco-Cannondale replica bicycle (photo right). I didn’t like its proportions as much as my other bikes, and it had quite an inferior component group, although I pointed out to my wife that I had tuned up its drive train so well that it ran quieter than any of rest of my bikes! The low-end components had made the bike very affordable at the time of purchase.
   Turns out the Cannondale should have been even more affordable, had I again not received incorrect information from the seller.
   Back when I bought this bike, it was listed as a R2000 Si, and I had no reason to believe otherwise, as the picture of the bike looked exactly the same as others I found on sites like BicycleBlueBook and BikePedia. Some of the components were different, but offering a frame with lower level parts isn’t an unusual practice for bike shops attempting to sell at a lower price point.
   When I eventually decided to sell this Cannondale, I met a gentleman who was VERY thorough – in fact, he took about a half hour to look it over, tweak things and take a little test spin around a nearby parking lot. He was struggling with the decision and told me his wife was going to inspect the bike just as closely when he got home. After much deliberation, he agreed to my asking price, and I figured that he was satisfied with everything.
   I really shouldn’t have been surprised when I received a call from him a couple of days later. His wife was getting on his case about the money he had spent, and he started a little investigating. It turns out that Cannondale made an R700 - an identical bicycle of a bit lower quality, which turned out to be the actual model of the one I sold. Ignoring the fact that I had made some upgrades, he was claiming I made some misrepresentation of the bike for sale. I told him that I had never seen anything about the R700, but agreed, after looking closely at the specs, that he was totally correct in its identification!
   I definitely didn’t want him to think that I deliberately listed the wrong model bike, and I wanted him to be happy with his purchase. I really want customers to spread a good word about doing business with me, so I quickly agreed to send him a partial refund for the difference in value between the two bicycles.

   This all leads up to the purchase of my like new 2013 CAAD10 bicycle. I briefly considered a carbon fiber Cannondale, but I already have a carbon bike that I love, so I thought a better move would be a purchase of the latest in aluminum frames (although Cannondale just came out with the CAAD12, for some reason skipping the number 11). This time I would purchase a 54 cm to more closely match the fit of the FP2.
   I had initially bought a 2012 CAAD10 in Cannondale team colors with Shimano 105 components via eBay, but the (honest) seller contacted me the next day to let me know he had discovered a dent under the top tube during packaging. Since he had listed it “like new”, he felt he should check before shipping to make sure that I still wanted to go through with the purchase. With my recent run of bad luck, I really wanted no part in buying a damaged bicycle, so I requested the refund.
   This turned out to be a really fortuitous event, since I had seen on craigslist a newer version of the bike with a bit more splash of color. I had actually made an offer on this bike a week before the eBay purchase and had been turned down, with the seller citing some other buyer. This transaction must have fallen through, and the seller was more willing to go with my price the second time around.


   I did want to swap out a compact crankset and found a very lightly used version that matched the existing components, and the one that came on the bike had seen less than 200 miles (according to the seller), so it should be an attractive re-sell item! The parts came Thursday, so I was able to take the bike out for a test ride on Friday afternoon.
   I didn’t have a particularly good riding experience, feeling a bit fatigued when I finished. By my regular standards, I hadn’t gone on a very long route, but something just didn’t feel right - I wasn’t sure if further adjustments needed to be made or if the general ride quality was poor. I did have a bad night of sleep the night before and wondered if that was also part of the equation.
   We had an unbelievably warm December day on Sunday, so I chose the Pinarello for a long ride (in shorts and short-sleeves!), but I definitely wanted to get back to the Cannondale for my ride today. I made sure to be more attentive to all aspects of the experience this time around.
   I was amazed at first to find that the two bikes were very similar in weight – had it not been for the carbon components and wheelset on the FP2, I probably wouldn’t be able to tell the difference lifting each up with my eyes closed! I decided to take the CAAD10 out on a hilly route today, and the stiff aluminum frame really shone on such terrain. There is absolutely no flex when standing on the pedals – perfect power transfer!
   However, I do think the CAAD10 feels a bit harsh on the not-so-smooth PA roads. Although I am used to the plusher feel of cork bar tape and a slightly bigger diameter bar tubing on some of my other bikes, I don’t think the problem is up front. The bike has a carbon fork to absorb vibration, and I didn’t feel changing up hand positions was any more necessary than usual.

   The technology has improved enough in manufacturing the aluminum alloy, that the extremely over-sized diameter downtube that was once a trademark of the Cannondale design is no longer necessary. This change definitely results in weight reduction, but I’m not sure some vibration dampening wasn’t eliminated at the same time. The rear stays are also spindlier, and they lack the bowed-in shape (photo left) of earlier Cannondales, which I’m sure had provided a bit of flex over bumps.
  
   Maybe I’ve been spoiled overall by the ride quality of my bikes through the years, but it might take a bit of time to get used to this Cannondale. Merry Christmas and Happy New Year!


Thursday, December 3, 2015

Over the River and Through the Woods

   Although the autumn weather has been a bit erratic, with rainy days coming in bunches and some blustery days mixed in, the temperatures have been reasonable enough that I’ve been staying in some semblance of cycling shape. It does take a bit longer to shake out the rust, but after a half hour or so I start to recall a bit of the form I was in around mid-September.
   I’m not fooling myself into thinking I could rip off a metric century, but anything around the 30 mile mark still feels pretty good. On some of the windier days I’ve turned to my ‘cross bike so that I could take advantage of some of the cover provided by the forests and rock cuts featured around the area rail trails.
   I received a surprise call from a friend returning earlier than expected from his Thanksgiving travels, and he suggested we get together for a ride Sunday afternoon. Scott was eager to put a new Cannondale through a test ride, so I created a kind of all-star route of some of my favorite circuits over the hilly topography around northern Chester County.
   Scott is about 20 years younger than me and is in very good shape, but I put in considerably more miles on a regular basis. He also is a couple inches taller with a more powerful build, so I had a bit of concern how he would handle my pace on this rolling terrain. I told him there were several places we could bail if it turned out too long, or we could simply back off the tempo if needed.
   The day was a bit overcast, but the scenery through the hills and across the farmlands in the region is always beautiful, as Scott pointed out several times, since it wasn’t an area he frequented. He insisted that I send along my MapMyRide details of the route, in case he would want try it out on his own.
   I don’t generally like to lead on rides for the duration, since I feel responsible to hold a pace with no rest, but since I was the one with (mental) directions, I really had no choice. It can also be a bit of a drag to check the location of rider(s) behind you. I was glad to find that he was right with me on all but the really tough sections, although Scott admitted at one point that he needed more hill work.
   The funny thing was that my young friend was a bit gun-shy about the downhills. I felt bad at one point when I turned around to find he was a few hundred yards behind. At least in this case, a fairly short brake application had him catching up easily. I told him that I was too used to following my crazy wife, who bombs down slopes at over 40 miles per hour. I think the image of me nervously following her down a steep descent eased any embarrassment he might have had.
   As we were nearing our return to Scott’s apartment and the bit of low sunlight that was filtering through the clouds began to fade, the temperature dropped noticeably. We both expressed a wise choice of full-fingered gloves, and I was glad to have slipped on some shoe covers to keep the chill from getting through the vented soles. Although we would have much preferred weather for shorts and short sleeves, we noted how it was nice to have such a great workout and not be sweating profusely afterwards!

   During the winter months I will be taking a break from my regular writing pace and will probably be checking in every other week or so. Things tend to slow down in the shop, and I’m determined to sell off a number of the bicycles I currently have in stock before starting any new projects. I did pick up the Monteverde frame from Bruce last week – it looks wonderful. However, the paint has to cure for about a month before applying the VeloCals in order to prevent bubbles from forming underneath the decals due to outgassing.

   I was waiting for the arrival of a few small parts before I could complete the Pinarello Prince, but I was able to put the finishing touches on that project a couple of days ago. I’ll leave you with a few photos of yet another bicycle waiting to find a new home…


Tuesday, November 17, 2015

I don't believe in karma!

   I had asked in an August blog post, Where is my GOOD karma? after I had righted a wrong and was "rewarded" with a string of project problems. Now I think there is no such thing!

   I was out on a ride Sunday afternoon and passed someone who had his bike turned upside-down in the grass with the front wheel removed. I asked if he had everything he needed for the repair, and the gesture I received in response was an extended flat hand, wiggled side to side to suggest "sort of".
   I did a quick U-turn to help out, since I had tire levers, a patch kit and pump - I also had a spare tube, but it wouldn't have been any use with his tire size. He explained that he had all the required items but couldn't get the tire off of the rim. His first mistake was not letting out as much air as possible to relieve all tension from the wire bead, and after that I made pretty quick work of the removal with his levers.
   He was very thankful, and I commented that the hundreds of times I had performed tire changes made stopping to help no trouble at all. Wouldn't you know it...just a few miles down the road - pssssssst, I get a flat of my own. You have to be kidding me!! 
   Makes me wonder what would have happened had I just waved at the guy and said, "You're on your own, dude!"

   Not too much to report in the shop this week, except that the Prince frame arrived in great shape (although I have yet to work on building the bike) and that I was able to make a bike sale - yay! I also met a fella named Chris who was looking to upgrade some parts on his 2003 Lemond Alpe d'Huez.


   I was amazed by the lightness of the steel bicycle, but I knew Reynolds 853 tubing was high-quality, race-worthy stuff! After some initial research on the bicycle, I was surprised, since it lacked any labels on the part, to find out the fork was carbon. I also found out the Lemond company had painted these bikes with an undercoat (in this case orange) that matches the decal set. Any scratch or chip to the frame will complement the color scheme!

   I also finished application of the VeloCals to the Basso Gap frame. I think it looks pretty classy!


Wednesday, November 11, 2015

Spinning Wales?

   I took a long ride into Philadelphia on Monday in order to check out the newly-opened connection across the spectacular Pennsylvania Railroad Bridge near Manayunk, over to the Cynwyd (pronounced KIN-wood) Heritage Trail. The bridge is a wonderful addition to the area network of trails, and provides wonderful views of the surrounding river valley.
   This connection has been a longtime work in progress and will be a great draw to a section of the city that is already an attraction because of its restaurants, bars/clubs and shops. Unfortunately the approach to the Cynwyd Trail is awkward, as developers failed to re-acquire the right-of-way that would have provided smooth access to the ramp up to the Manayunk Bridge.

The Manayunk Bridge when it still had rail traffic

   When the route was being planned, I suspect there were objections by property owners in the neighborhood, as it seems the on-road section of the trail could simply have been diverted from Umbria Street to Wright and Canton Streets to reach the ramp. As it stands, cyclists heading towards Manayunk from Umbria Street need to zigzag to the right at a busy intersection with Levering Street and ride up High Street to hit the Cynwyd Trail-head. Those wishing to reach the trail from the canal towpath or from Main Street in Manayunk will face a short, steep climb to the right up Levering Street to reach High Street.
   Although Manayunk's bustling Main Street is marked with "sharrows" to allow cyclists to ride in the center of the lane along with motorized vehicles, there is a constant threat of being "doored" or cut-off by customers pulling in and out of parking spaces. The canal towpath is an alternative, but its cinder surface is discouraging to those of us with road bikes. Paving that route would be a great alternative, and again, some access points need to be improved for that option as well.

Approaching the Manayunk Bridge from the south

View of the Green Lane Bridge from atop the Manayunk Bridge
   Certainly the big highlight of the Cynwyd Heritage Trail is the railroad bridge over the Schuylkill, but the rest of the trail forms a two-mile linear park up to the Cynwyd train station, used by SEPTA. Along the way you will encounter interpretive signs about the area's industrial heritage, as well as railroad remnants, like the overhead towers that once carried the catenary (electrified cables) that powered the trains across this line. You might even spot the ruins of Barmouth Station, which until 1986 served passengers on the SEPTA Ivy Ridge Line.


Cynwd Station, built in 1890, sits at the southern end of the trail and still serves SEPTA passengers.
   If you are like me and aren't intimidated by city traffic, you might even attempt to make a loop from Manayunk, up the Cynwyd Trail then out Conshohocken State Road to Belmont Avenue. There are some sections marked with bike lanes, and once in Fairmount Park, there is a path separated from the street, but I'll warn you that it will be rough on a road bike!
   From there I head east on Parkside Avenue, meet up with Girard Avenue and cross the bridge back over the Schuylkill River. A right-hand turn on Sedgley Drive takes me down the back of Lemon Hill to meet up with the Schuylkill Trail, where I can either turn north near Boathouse Row to return to Manayunk, or make a left to head past the Philadelphia Art Museum into the city.

   For those of you unfamiliar with our region, many communities just west of Philadelphia have names influenced by the Welsh-speaking Quakers who had settled nearby. Several of these places have anglicized pronunciation, such as Penllyn (PEN-lin) because the Welsh double-L sound is quite difficult (try putting a hard H and L together), and Gwynedd (GWIN-ed), which really should have the double-D sounding like TH in “the”. Bala Cynwyd, Gladwyne, Bryn Mawr and Radnor are other well-known neighborhoods in the area with Welsh names.
   As I passed by signs and mile markers for the Cynwyd Heritage Trail (which is NOT flat, by the way), I was constantly reminded of my “search for Welsh-ness”.
   About a decade ago, when I took a serious interest in my family tree, I was mistakenly given the idea that our Larimer descendants were Welsh, and having a name like Glen Owen, I had no reason to argue. Now, I also knew that our surname was somehow associated with the French word “lormier”, which describes a maker of bridles, stirrups, etc., but with the Norman Invasion being such a significant part of British history, I thought maybe our last name had just been distorted over time. I even envisioned our last name at one time spelled “Llarymr”, or with some similarly unusual Welsh spelling.
Larimer family crest
   However, through later email conversations with other Larimers through Ancestry.com and from information in a book on our family, I learned the Lorimier or La Ramiere (two of about a dozen different spellings I’ve seen) families were most likely among the 500,000 Protestant Huguenots who fled France by the 18th century. I’m fairly certain the Larimers who emigrated to Berwick, PA, in the late 1700s did not come directly from France. They were most likely among the great influx of “Scotch-Irish” (of which very few were either Scotch or Irish – look it up yourself) that came to live and work in early industrial Pennsylvania.
   I also read about the other branch of the Larimer tree that included William, who founded Denver, CO, and his daughter Rachel, who married into the wealthy Mellon family – damn!
   Well, as it turns out, I do have a connection with Wales, but it comes from my mother's side of the family as her great-great grandparents, Hugh and Anna Edwards, emigrated from Cymru (the Welsh word for the country, pronounced KUM-ree) in 1845.
   Before I became aware of my true roots, I had absorbed as much as I could about Wales, reading up on the history of the country and its culture. I even learned some of the language, which proved quite difficult, since it has many of our letters but pronounces them differently! I even fooled a couple of people into thinking my name was derived from Owain Glyndwr (glen-DOOR), who was the last native Welshman to hold the title Prince of Wales. He led a long-running, but ultimately unsuccessful revolt against English rule from 1400-1415.
   Whatever my genealogical connection, I couldn’t help but fall in love with the country when my family and I visited Wales in 2009. We took the requisite castle tours, visiting Conwy, Beaumaris, Caernarfon and Harlech, and drove through Snowdonia National Park (Mt. Snowdon is the highest British peak, outside of the Scottish Highlands). I recently saw a YouTube clip on Global Cycling Network featuring a trail ride in mid-Wales near Llyn Brianne Reservoir that looked fantastic – have to go back!

Carrick and I try lawn-bowling (similar to Bocce) outside of Beaumaris castle

Caernarfon - traditional coronation spot for the Prince of Wales

Snowdonia National Park

Now for a return stateside and an update on ongoing projects..

   I recently met a nice gentleman named Paul who presented me with a couple of complicated problems, included a rusty bottom bracket that had serious need of an overhaul. After a few days of soaking in a solvent called PB Blaster, I successfully removed the lockring to the adjustable cup side of the bracket, but nothing else would budge a millimeter!
   I hoped my buddies at Bikesport might have another suggestion, or perhaps a more effective tool for removal. Turns out what it really needed was three people working together – one to hold the slim removal wrench up against the bottom bracket so it wouldn't accidentally slip off when they the applied torque, one to hold the handlebars to keep the bike steady in the shop clamp and one to manipulate the long bar they had slipped onto the tool to provide extra leverage!
   Removing the opposite side didn’t seem worth the effort, since I could access the bearings for cleaning and lubrication. When finished with the prep work, I simply slipped all the parts in from the fixed bracket side and cinched it all together as tightly as possible, since I knew the adjustable cup was stuck in the right place!
   Paul also brought an older model brake/shift lever that wasn’t working anymore. Levers like this early-1990s RSX seven speed shifter often just get jammed with dirt and old grease, and it is a matter of flushing them with a degreaser and then lubricant. The most effective way to clean them completely is disassembly, which is quite intimidating, considering their watch-like mechanism. I won’t go into describing the procedure in detail, but if you are interested, this YouTube video put together by a fellow "wrench" gives you an idea of the operation.
   I am waiting for my friend Ron to deliver his stripped Monteverde frame and a sample of the “Flamenco Red” color he wants to have it painted. Bruce informed me the he finished the touchups to Ron’s Basso frame, and I have the appropriate VeloCals ready to go for that project. It’ll be a pick one up, drop two off, since Ron says he also has an old Schwinn he also has stripped and ready for a new paintjob. I’m still trying to get a count of all of the bikes in his collection!

I’ll leave you with a set of pictures of the completed Pinarello Gran Turismo:


Tuesday, November 3, 2015

A Pinarello Party!

   Because I will soon have five bicycles of the legendary Italian brand in my home, including my own FP2, someone is going to think I am a Pinarello dealer. As I always point out, more Tours de France have been won on bikes built by Giovanni Pinarello’s company than those made by any other. Sure, Pedro Delgado, Miguel Indurain, Brad Wiggins and Chris Froome would be outstanding cyclists on ANY bike, but their choice of machine certainly stands out!
   As expected, with my recent run of luck, the cracked carbon frame appears more serious than just a paint flaw. It was suggested that I take the frame to a Pinarello dealer to see if the company might have some type of second owner replacement policy, which some manufacturers have started to honor in order to claim life-long customers for their products. Luckily, Tailwind Bicycles in Schwenksville, just a 15-minute drive away, sells Pinarellos, but I was quickly informed that they don’t have such a program in place.
   Another option was to have the shop contact Pinarello about “crash replacement”, which the clerk informed me doesn’t actually have to involve some type of accident. Well, unfortunately the company didn’t come through, as far as any type of replacement for the cracked carbon frame, since they have a 3-year window in which such problems to be taken care of. With this being a 2010 frame and since I had no proof of original purchase to aid in establishing timeline, I can’t really blame them.
   In order to recover as much of the financial deficit as possible, I’m attempting to sell the frameset on eBay, with hope that there is someone out there willing to take on the repair. Perhaps he/she has the carbon skills to do so or might want to pay to have the work done. The price I’ve seen for the repair/paint, not to mention shipping back and forth to the West Coast (where the most reputable outfits all seem to be), will just put me deeper into a hole.


   I’m also planning to use the components, which are in fantastic condition, to build up another Pinarello, since the majority of the parts are MOst (correct typography), the company’s in-house brand. I found a fantastic 2003 Prince SL frame (photo above) on eBay at an incredible price, considering its original MSRP was $2700! I don’t know if the owner was impatient or desperate for cash, but I seriously hope there is a chance I can make back all of the money I’ve spent on this FP2 disaster, just with this Prince build.

   Bruce did an amazing job matching up the look of the paint on the ‘70s Gran Turismo. The top tube had looked like someone got into the very bad habit of leaning the bike or perhaps locking it up to something, and the paint was scraped away badly the length of the tube. You can see a bit of the damage in the top left of the photo below.


   I didn’t want to totally repaint the frame, mainly because I didn’t want to sink a lot of money into the original cash/trade transaction for the dark blue Treviso I had built, but also because this Treviso’s paint had such a cool aged look. The bike had an undercoat of gold with a transparent red, perhaps a tinted clearcoat, on top. Over time, some of the red faded or wore off in spots, giving the bike a really unique patina, particularly around the lugs, which almost appeared to have a gold outlining.


   Before I started to work on the bike, I had consulted with Bruce, and we came up with the idea of spot-sanding the top tube only, down to the bare metal. He was going to experiment a bit with gold and red to come up with the best effect before final painting. He intended to blend in the color as he worked towards the lugs, and he did some fantastic work (see photo above)!

   My last attempt to figure out what was wrong with the shifting on the Vuelta was to install the SRAM rear derailleur from the damaged FP2, just to make sure the right-hand shifter wasn’t the problem. After a few small adjustments to align the 10-speed derailleur to the 9-speed cassette, it shifted perfectly up and down through all cogs! I was convinced that it had to be the Athena derailleur’s awkward cable routing causing a pinch spot and just enough tension to mess up the shifts.
   When I was finally fed up trying to find a cable solution, I took the bike over to Bikesport for a second opinion. After they had no better luck with the Athena derailleur, I took their advice and I decided to buy a different Campagnolo derailleur that was 9-speed-specific. The Campagnolo Record derailleur works very well, and I will include the Athena derailleur in the sale, just to keep the complete group together. The part performs perfectly with friction shifters, so maybe it can be used somewhere else.
   Finally, here are some photos of the completed Vuelta build:  


Wednesday, October 21, 2015

When will the "fun" EVER end?

   Besides being frustrated by a backload of finished projects that I need to sell off, my series of unfortunate events continues, as it was discovered the Pinarello FP2 frame had a couple of hairline cracks on the drive-side chainstay. The problem was hidden on the inside of the tubing by the back wheel, and since I somehow managed not to see it (perhaps distracted by the condition of the rest of the bike and the great deal I thought I was getting - ha!), I would like to think the person who sold it to me through craigslist wasn't aware of the problem either. 
   Just when I had the seatpost issue fixed and thought I was in the clear, I now have to have to take the frame to a carbon expert to have it assessed. I'm praying that it is simply a flaw in the paint and topcoat, but with my recent run of luck (all bad), I really am expecting the worst.


   Understandably, my friend Scott no longer wanted any part of this bicycle deal, so I am on the hook for this Pinarello, one way or another! 

   The other Pinarello is a mix of news. VeloCals returned my email with some helpful advice about removing their decals with a blow dryer. Unlike a heat gun, its temperature is gentle enough to not harm the finish, yet warm enough to soften the adhesive. Using a small butter knife (also a suggestion from the folks at VeloCals) I lifted a corner of the decal. Moistening my fingers with soapy (per instructions, only using Dawn dishwashing liquid) water, I kept the heat over the decal as I pulled it from the frame.
   The Pinarello Treviso font is slightly less bold than that on the Vuelta, but this proved to be any advantage, as the transparent buffer zone around the lettering made each decal almost an exact fit within the voids left behind in the clearcoat by the old flaked-off logo.
   I wet the back of each letter in the soapy solution so that I could line them up correctly, then squeegied out the water with an old credit card I saved just for this process (now that it's become fairly frequent). I applied a bit of hairdryer heat to take the curl out of the decals and to help reactivate the adhesive. The process took quite a bit of time, but the results look better than the initial attempt at applying the decals.


   The bad news is that I am having an impossible time tuning up the shifting. I'm pretty sure there is a spacing issue between cogs, which can be solved, but I can at least I can hit all of the cogs with some "chatter" on the up shift. I'm more concerned with the derailleur skipping when down shifting, which seems to be from too much tension on the cable. I suspect this may be due to an awkward bend from the cable entry point on the derailleur to the cable clamp. I have to do some experimenting with another derailleur that I know functions properly to make sure the lever's ratchet mechanism isn't shot.

   I've met a fellow vintage bicycle enthusiast named Ron, who seems to enjoy collecting and researching more than the "wrenching" aspects of the hobby. Although he recently hooked up with an interesting frame from the well-known Italian builder Basso, I get the impression that he prefers some of the smaller European builders.
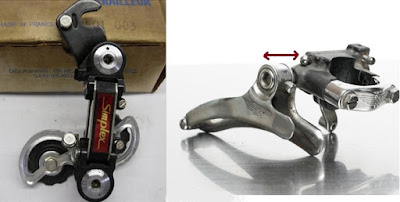
   He requested some alterations to a 1970s Vainqueur bicycle from Luxembourg, which had a crazy mix of British and French parts, including old cottered cranks which were well past their time of usefulness. And what did we replace them with? Japanese Shimano parts, of course! I was disappointed that I couldn't save the French Simplex rear derailleur (see stock photo on left below), which had pulleys that were severely worn down. I was hoping to just change the pulleys, but they had a different axle width than those I had in supply.


   Ron had supplied me with a spare Shimano rear derailleur, so I installed that as well. The front derailleur (above right pic) worked perfectly, although in a manner I had never seen before. Instead of a derailleur cage that pivots on a parallelogram shape, this Simplex derailleur had a telescoping arm that extends/retracts to change chainrings!

   A very cool frame from an obscure Italian builder, Monteverde, was another of Ron's finds, and it had interesting cut-outs in the lugs and a really unique art nouveau logo font. Unfortunately the paint has issues and the logos were damaged badly. However, Ron is enthusiastic about stripping and repainting, and I convinced him that I could put my art/graphics background to use and recreate the artwork for some custom decals.


   Finding a matching font online was relatively easy, and luckily the headbadge wasn’t majorly complex. With a Canadiens (a trial separation is in place from the forever-frustrating Flyers) hockey game on in the background I was able to reproduce everything in a couple of hours with a CorelDraw program. Luckily this admittedly outdated software has an exportable format that will work with VeloCals’ Adobe Illustrator program. For some reason the colors don't match in the reproduced image, but they do in "real life".

    The Basso frame is a bit small for Ron to use for his own bike build, but he couldn’t resist it at the asking price. We plan to just touch up its (unfortunate) repaint job, add some decals that are appropriate to the bike, then simply sell the frameset. I found a feature on a restoration of the same model “Gap” bicycle (photo below), matched the decal style and colors to some in the VeloCals online catalog and placed an order.


   Bruce, my airbrush buddy, informed me that the ’70s Pinarello frame should be done this week, so yet another completed bicycle will be hanging in the rafters. I’m going to have to move some into the garage soon!


Wednesday, October 7, 2015

Me and My Shadow

The run of bad luck continues…

   Removing the Pinarello decals from the Vuelta frame was fairly easy, since they were flaking badly in the first place. I also found a helpful tip to loosen the remaining material, using a liquid with which I was very familiar. MicroSol is a product used by modelers to soften decals so that they conform to details on molded plastic. I have used MicroSol many times on model railroad freight cars and locomotives that I have custom painted and decaled.
   Unfortunately attempts to smooth the clear coat lines that were left around the removed letters did not go well. The ScratchX product that had been recommended didn’t do much besides leave a nice shine – no complaints there, but the clear coat lines remained.
   My hope that the Velocals would line up in the letter “voids” and negate the problem didn’t work out either. I figured they would be historically accurate, but the spacing (or kerning, as some call it) between the letters was slightly different, which made each letter slightly off even more as you view them left to right.
   Putting the Velocals in the proper spot was complicated by the fact that the original decals weren’t exactly centered on each side of the downtube. In addition, the application process involves spraying water over the area to allow repositioning before the aggressive adhesives lock down the lettering, and when wet, the clear coat lines I was using as a general guide practically disappeared. Finally, the decal backing paper was opaque, so I couldn’t get a very good view of the results as I was working. As it stands, the lettering looks like a drop-shadow effect used in artistic fonts.


   At first I thought, “Well it looks a whole lot better than the flaking old decals, and someone would only notice when looking close up, “ but I am far more finicky than that to just let it go as-is. Having to buy another set of (not cheap) Velocals is a bit frustrating, but I want it to look right – and more appealing to a prospective buyer! I could apply the letters individually into each empty space, using painters tape in combination with some guide lines drawn on the backing paper, but that would take hours to do each side of the frame! I contacted Velocals about a possible re-print using the correct spacing dimensions (which I could provide), and I’m waiting for a reply.

   A local college student asked me to help him find a bicycle with the intent that he was going to get into racing soon. I had found on craigslist a Pinarello FP2 at a very good price, which included a wonderful extra wheelset and cassette. This bike was identical to mine, except with a different color scheme, and because I love mine, I was a bit shocked that my buyer was indecisive. He thought the bike was of a more recreational level, and I quickly pointed out that it was essentially the same design that Bradley Wiggins and Alejandro Valverde rode to Grand Tour victories, just with a lesser grade of carbon fiber and without the elite-level component groups. This is a RACING BICYCLE!


   Anyway, he ended up getting something else, but I wasn’t going to let the fantastic deal go, since I knew I could find a buyer. A friend of mine contacted me soon afterwards to buy the Pinarello, and the wheelset was used on a build for another friend, so I had made a nice profit. I couldn’t possibly get by that easy, could I?
   No. My friend Scott called after he had tried to move the saddle down slightly, and the seatpost wouldn’t budge. The FP2 has an aluminum sleeve in the seat tube, and the previous owner did not lubricate the aluminum seatpost before inserting it into the bike. Needless to say, the two like metal surfaces had oxidized and fused together!
   I won’t go into all the attempts made by me and my pals at Bikesport to free the post, but it seemed that I might be faced with shipping the problem to a carbon frame expert, who assured us he has handled this issue many times and could take care of it. However, the expense of the process, plus the shipping both ways, would put me into a deficit on this transaction.
   The brilliant Bikesport guys came up with a “Plan C” that involved cutting the seatpost flush with the seat tube and then buying a replacement post that has an outside diameter that will fit inside the part that is stuck in the frame. They will use the existing slot in the back of the seat tube as a guide to cut a matching slot in the back of the post to allow expansion/contraction, so the seat tube bolt can do its intended job as well.


   One recent positive for me is that the headset spacer arrived, fit perfectly and I was able to finish up the Schwinn Paramount bicycle. I like the look of this rather inexpensive build (now for sale):