The run of bad luck continues…
Removing the
Pinarello decals from the Vuelta frame was fairly easy, since they were flaking
badly in the first place. I also found a helpful tip to loosen the remaining
material, using a liquid with which I was very familiar. MicroSol is a product
used by modelers to soften decals so that they conform to details on molded
plastic. I have used MicroSol many times on model railroad freight cars and
locomotives that I have custom painted and decaled.
Unfortunately attempts
to smooth the clear coat lines that were left around the removed letters did
not go well. The ScratchX product that had been recommended didn’t do much
besides leave a nice shine – no complaints there, but the clear coat lines
remained.
My hope that the
Velocals would line up in the letter “voids” and negate the problem didn’t work
out either. I figured they would be historically accurate, but the spacing (or
kerning, as some call it) between the letters was slightly different, which
made each letter slightly off even more as you view them left to right.
Putting the
Velocals in the proper spot was complicated by the fact that the original
decals weren’t exactly centered on each side of the downtube. In addition, the application
process involves spraying water over the area to allow repositioning before the
aggressive adhesives lock down the lettering, and when wet, the clear coat
lines I was using as a general guide practically disappeared. Finally, the
decal backing paper was opaque, so I couldn’t get a very good view of the
results as I was working. As it stands, the lettering looks like a drop-shadow
effect used in artistic fonts.
At first I thought,
“Well it looks a whole lot better than the flaking old decals, and someone
would only notice when looking close up, “ but I am far more finicky than that
to just let it go as-is. Having to buy another set of (not cheap) Velocals is a
bit frustrating, but I want it to look right – and more appealing to a
prospective buyer! I could apply the letters individually into each empty space,
using painters tape in combination with some guide lines drawn on the backing
paper, but that would take hours to do each side of the frame! I contacted Velocals about a possible
re-print using the correct spacing dimensions (which I could provide), and I’m
waiting for a reply.
A local college
student asked me to help him find a bicycle with the intent that he was going
to get into racing soon. I had found on craigslist a Pinarello FP2 at a very
good price, which included a wonderful extra wheelset and cassette. This bike
was identical to mine, except with a different color scheme, and because I love mine, I was a bit shocked that my
buyer was indecisive. He thought the bike was of a more recreational level, and
I quickly pointed out that it was essentially the same design that Bradley
Wiggins and Alejandro Valverde rode to Grand Tour victories, just with a lesser
grade of carbon fiber and without the elite-level component groups. This is a
RACING BICYCLE!
Anyway, he ended up
getting something else, but I wasn’t going to let the fantastic deal go, since
I knew I could find a buyer. A friend of mine contacted me soon afterwards to
buy the Pinarello, and the wheelset was used on a build for another friend, so
I had made a nice profit. I couldn’t possibly get by that easy, could I?
No. My friend Scott
called after he had tried to move the saddle down slightly, and the seatpost
wouldn’t budge. The FP2 has an aluminum sleeve in the seat tube, and the
previous owner did not lubricate the aluminum seatpost before inserting it into
the bike. Needless to say, the two like metal surfaces had oxidized and fused
together!
I won’t go into all
the attempts made by me and my pals at Bikesport to free the post, but it
seemed that I might be faced with shipping the problem to a carbon frame expert,
who assured us he has handled this issue many times and could take care of it. However,
the expense of the process, plus the shipping both ways, would put me into a
deficit on this transaction.
The brilliant
Bikesport guys came up with a “Plan C” that involved cutting the seatpost flush
with the seat tube and then buying a replacement post that has an outside
diameter that will fit inside the part that is stuck in the frame. They will
use the existing slot in the back of the seat tube as a guide to cut a matching
slot in the back of the post to allow expansion/contraction, so the seat tube
bolt can do its intended job as well.
One recent positive
for me is that the headset spacer arrived, fit perfectly and I was able to finish
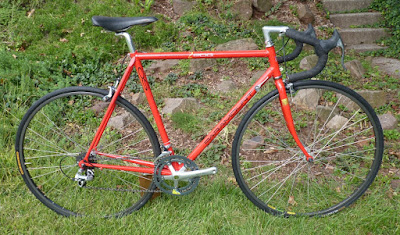
up the Schwinn Paramount bicycle. I like the look of this rather inexpensive
build (now for sale):


No comments :
Post a Comment