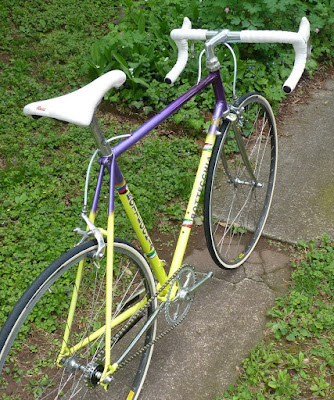
Some of the braver single-speed cyclists will go the authentic route of a fixed gear (no coasting!) and no brakes, which requires the rider to gradually slow his or her cadence in order to come to a stop - or lock up the wheels and skid, if possible. Other folks (the wiser ones, in my opinion) will add handlebar brakes for safety and maybe use a single cog with a freewheel.
One of the bicycle projects handed to me by my friend Brendan was a single-speed conversion of a 1989 Bottecchia ADR Team bicycle. This bicycle model replicated the machines used by Greg Lemond's team when he achieved his famous 8-second victory in that season's Tour de France. The setup on this bike would be "for safety sake"!
I had been tinkering with the Bottecchia intermittently in between other projects and as parts arrived in the mail. The frame's paint needed a little bit of attention as well, and I had luck matching up the neon yellow areas that had significant issues, like the edges of the bottom bracket shell (photo below).
Unfortunately, the iridescent purple was nearly impossible to replicate. I did my best, even mixing some red and blue metal flake enamels to at least camouflage some of the worst areas under the top tube where sweat created some paint bubbling to the original finish. I had mentioned in an earlier post how I used a product called Metal Rescue to remove the rust, and it's always better to have the bare metal areas covered to protect the frame.
 |
| Hey, I can't always show only my successful results! |
I was made aware early in the assembly of the bicycle that it was fortunate the Bottecchia frame had short horizontal dropouts so that I could manually adjust the chain tension by by simply pulling back the rear wheel to the proper position. With the wheel centered, I then set the dropout adjustment bolts on each side in the right spot for future reference (see close-up below).
Traditional track bikes have a fork end (see diagram below) to similarly adjust the chain tension by bolting the rear wheel in place in the correct position. Some folks with bikes that have long horizontal fork ends like to mount a chain-tensioning device like the one featured in the second photo below.
With the previously described drivetrain issues avoided, the only major difficulty assembling the bicycle was feeding the brake cable/housing through the top tube. With a carbon fiber or aluminum bicycle this process is fairly simple, since you can guide a cable with a magnet. Unfortunately this doesn't work as well with a steel frame as everything becomes magnetized and the cable will wander from its intended direction.
After a quick internet search, I discovered a clever solution using a shop vac and a string. I simply sucked the string through from one cable port to the next, then taped a cable to one end of the string and pulled it through. I then used the cable as a guide for the housing when I pushed that through, and I just had to use a small metal pick to slightly pry the housing end upwards through the frame at the exit point.
I'll finish off this week's entry with some photos of the competed bicycle:


No comments :
Post a Comment