Well, this adventure bike is indeed a bit of a prequel, as it has been in the works for over two years, pre-dating nearly all of the other bicycle builds to which I was referring. My friend Robert had brought this Marin MTB conversion to me back in the summer of 2020, and because of some complications and family circumstances, it took an extended period to bring its assembly to completion.
Speaking of complications, this build was full of them! Luckily they were of the minor variety, requiring some adapters, etc. to make everything work, and Robert had a pretty good idea ahead of time that this might not all work perfectly, so he was very reasonable when hitches popped up in the process.
The original plan was a custom paint job, but perhaps in a somewhat prescient move, since my buddy Bruce has become so busy that he has stopped taking on new work, Robert decided to take care of the paint himself. A powder coat of a nice sandy orange color was applied by someone in his neighborhood, and he added a simple set of black Marin decals that I had purchased for him a while ago.
Robert had mentioned some lower back issues that would keep him from riding in an aggressive position, and the idea was to include stem with a longer quill and a set of bars with shallow drops so that he could remain more upright. I don't work with a lot of MTBs, and this was the first vintage steel MTB frame that I had ever worked with - I had no idea they had 1-1/8" headtubes!
Luckily I was able to find a really nice vintage Ritchey MTB headset, and after installation I realized, of course, that a traditional 1" quill stem was not going to work, either. The long quill Nitto stem we had purchased was a real must to keep Robert in his desired riding position, so acquiring a shim for the stem would be a relatively simple solution.
However, the real difficultly with this bicycle was that the bike was originally a single-speed MTB with "track ends" (see photo examples below), instead of the type of dropouts usually seen at the rear stays of bicycles.
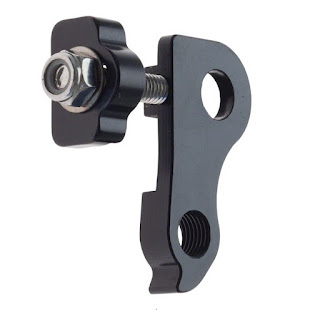
In lieu of installing a derailleur or tensioner pulley arm that would normally take up slack in a chain, track ends allow pulling back and locking down the rear wheel into the proper position to keep the chain taut. In this case, Robert wanted to have gears, and we had to turn to a hangar adapter (photo below) to solve the problem. It has a notch on the back which slides into the track end, and the upper hole is for the axle/quick release to poke through. The bolt and nutted end cap fit over the back of the track end to help keep everything in place.
This worked well for shifting nine of the ten rear cogs, but we found that the thickness of the adapter created too much of a reach for the derailleur, and there was difficulty transitioning into the largest cog. It seemed sacrificing the "granny gear" would be a necessary concession with this setup. I really like the SRAM GX Type 2.1 rear derailleurs, which have a clutch to keep back tension for 1x setups. I've used them many times on projects with similar drivetrain setups, but the one thing that I just don't get is why SRAM didn't include a barrel adjuster at the cable anchor spot like almost every other manufacturer does.
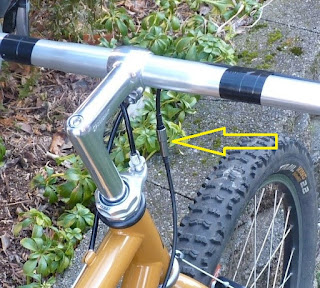
In order to achieve perfect shifting, the installation of a mid-cable inline barrel adjuster is absolutely necessary, indicated by the yellow arrow below:
I'm not always happy with the way drop bar levers work with cantilever brakes, as the longer pull can feel mushy, but if you set the pads at the minimum distance from the rims and keep the wheels true, they function well enough for trail use. I wouldn't do aggressive downhill mountain runs in this setup, but the brakes will stop you safely in every other situation!
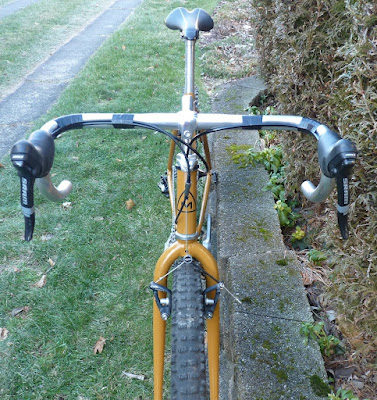
Finally, this series of articles has come to a close, and we'll bid it farewell with images of Robert's completed Marin Eldridge Grade Adventurebike (he told me he wanted to experiment with bar tape, which explains its absence):


The sram road brifters work with the mountain RD? What models did you use?
ReplyDeleteYes they do! Those are SRAM Red brake/shift levers and a SRAM GX Type 2.1 long cage derailleur. The only minor pitfall is that, for some reason, SRAM didn't design the GX derailleur with a barrel adjuster, so you need to install a mid cable barrel adjuster in order to perfect the shifts when setting everything up. You can see it in the head-on shot, near the headtube badge.
Delete