
Of course the highlight of this recent wave of work was final assembly
of my Cannondale, which was fairly simple once all of the appropriate parts
were collected. About a week ago I had taken off everything in anticipation, as
the photo above reflects, with all but the old cassette and bottom bracket removed at
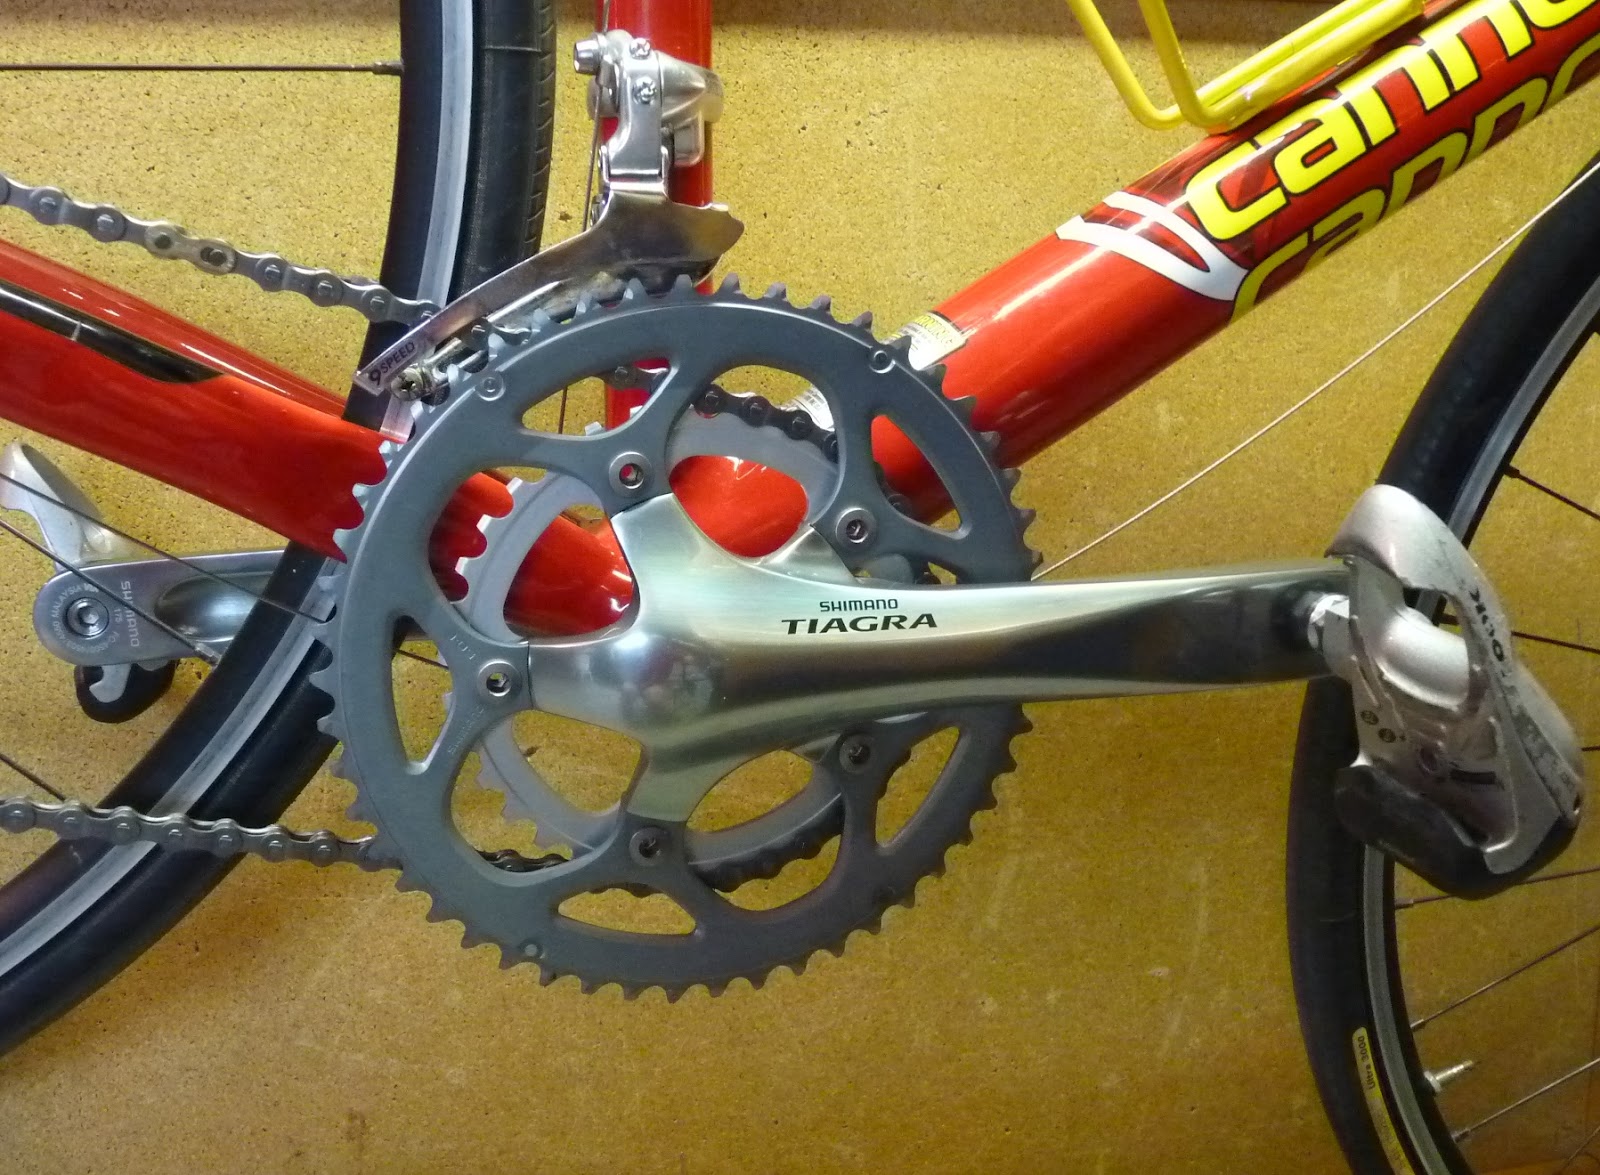
this point. The distortion of the right chainstay visible in the photo is not a
dent, but a built-in curve to compensate for the location of the chainrings. If you scroll down a couple of photos,
you can also see the curve in the lower photo with the new Tiagra compact
crankset in place.
 I mentioned in my previous blog entry that I had a delay because of an eBay
seller listing an incorrectly described derailleur, so while I waited for that
part, I took the time to put some new Cinelli cork tape on the bars. I also
routed the wiring and installed the computer mount. In the past I’ve bought
several mounts and install one on each of my bicycles, then I just switch the
computer out when I ride a different bike so that I can record the cumulative
miles.
I mentioned in my previous blog entry that I had a delay because of an eBay
seller listing an incorrectly described derailleur, so while I waited for that
part, I took the time to put some new Cinelli cork tape on the bars. I also
routed the wiring and installed the computer mount. In the past I’ve bought
several mounts and install one on each of my bicycles, then I just switch the
computer out when I ride a different bike so that I can record the cumulative
miles.
The crankset was the first part to arrive, and I was pleased to find
that I no longer had to wrestle with mounting each crankarm onto the spindle.
The bottom bracket on this Shimano set comes integrated to the chainrings and
right crank, and the process involves simply sliding the bracket through the
frame and tightening the cups on each side. I did have to give the drive side a
little bump with a rubber mallet to push it all the way through the frame. The
left side crank then bolts directly to the spindle, with a safety ring between
the bolts that only pops down when you have everything in the correct position.
The front derailleur bracket had to be loosened so that I could slide it
down closer to the smaller chainrings, otherwise the chain would rub on the
derailleur cage when in the smaller rear cogs. I left a couple of millimeters
of clearance over the large ring then tightened the bracket after making sure
the cage face was parallel with the rings. Adjusting the cage swing during gear
changes had to wait for installation of the chain.
 By comparing the earlier disassembly photo with the shot on the right,
the difference in size between the former 11-23 tooth cassette and the new
11-34 mountain bike cassette is obvious. The need for a long cage rear
derailleur is also apparent, allowing for adequate swing of the chain over
these cogs. At this point I hadn’t adjusted the derailleur, so the cable wasn’t
bolted down.
By comparing the earlier disassembly photo with the shot on the right,
the difference in size between the former 11-23 tooth cassette and the new
11-34 mountain bike cassette is obvious. The need for a long cage rear
derailleur is also apparent, allowing for adequate swing of the chain over
these cogs. At this point I hadn’t adjusted the derailleur, so the cable wasn’t
bolted down.
Correctly sizing the bicycle chain for a triple chainring or compact double
arrangement is important to ensure the right amount of slack is present
for smooth shifting, yet not so much that the chain is slapping down on the
stays when you hit bumps. The most effective method is running the chain around
the largest chainring and largest cog without going through the rear derailleur,
then overlapping one more full link. Note in the below left photo that a full link is
what I’ve marked between the blue lines. You then remove the pin from the
leftover chain section, but hang onto that section in case you need it for a
future repair!
 The photo also includes my favorite feature included by some chain
manufacturers, a master link (the gold-colored section), which completely eliminates having to mess with
pushing a link pin back into the chain. The master link has a face plate for
each side with a pin already attached and a tapered hole, which allows you to
pull the two ends of the chain together and connect them easily.
The photo also includes my favorite feature included by some chain
manufacturers, a master link (the gold-colored section), which completely eliminates having to mess with
pushing a link pin back into the chain. The master link has a face plate for
each side with a pin already attached and a tapered hole, which allows you to
pull the two ends of the chain together and connect them easily.
After adjusting the derailleurs, I was able to take the Cannondale on
long, hilly test ride. Not to be too overconfident in my abilities, I made sure
to stick a few basic tools in my jersey pockets, but I had absolutely no
mechanical problems. The bike performed perfectly, and I even found that I had
extra gears not needed on some of the worst climbs. I’m thinking that is
somewhat because I’m in such good form, but I bet there will be some longer
hills when those “desperation gears” will be appreciated, or on rides during
the first few weeks of next season!
No comments :
Post a Comment